发布日期:2023-01-18
在当今的企业开发环境中,我们不得不与代理打交道,通常是作为系统管理员。在大多数情况下,应用程序将配置为系统的默认设置,但如果您想对应用程序进行非常严格的控制,例如代理设置,对于这种情况,Java允许使用 API。
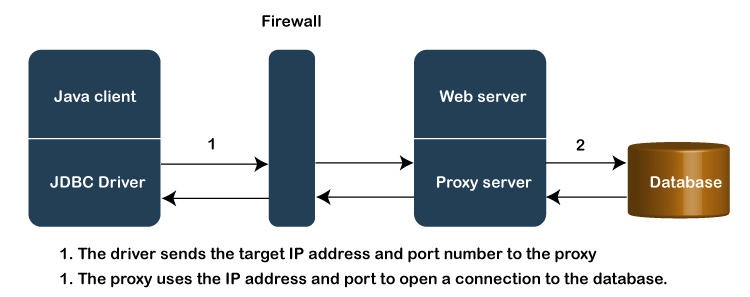
该代理服务器是像客户端应用程序和其它服务器之间的中间系统。在企业应用程序中,用于跨网络边界提供对用户内容的控制。下图演示了代理服务器的行为:
在本主题中,我们将了解如何通过 Java 中的代理服务器进行连接。我们将遵循两种方法在 Java 中创建与代理服务器的连接。
代理 API 从 Java 5.0 开始可用。但是,旧方法仍然有效并且可以用于我们的项目。但是 Proxy 类方法更有效且可定制。
使用代理服务器的优势
代理服务器在以下情况下很有用:
系统属性
Java 支持不同协议的代理处理程序,例如FTP、HTTP、HTTPS和SOCKs。我们可以为单个处理程序定义一个单独的代理作为主机名和端口号。Java 代理配置中提供以下系统属性:
注意:在 nonProxyHosts 的情况下,我们可以使用通配符(“*”)开始或结束主机模式。但是在Windows平台上,需要去掉“|” 分隔符。可以在此处找到所有可用代理系统属性的列表。
使用全局设置
Java 提供了几个我们在上面讨论过的系统属性来配置 JVM 范围的行为。对于特定用例,这些属性很容易实现。
我们还可以在调用 JVM 时使用命令行设置必要的属性。还有一种替代方法,可以通过在运行时调用System.setProperty()方法来设置它们。
让我们了解如何使用命令行设置它们:
使用命令行设置代理
我们还可以使用命令行参数设置代理属性。要使用命令行定义代理,请将设置作为系统属性传递,如下所示:
通过这种方式启动进程,我们可以在 URL 上使用openConnection () 方法而无需做任何进一步的工作,如下所示:
使用 System.setProperty() 方法设置代理
如果我们在使用命令行时遇到困难,可以使用 System.setProperty() 方法来替代。要使用此方法设置代理,请在我们的程序中按如下方式定义它:
稍后,我们可以取消设置系统属性,如果需要,它们将从我们的应用程序中删除。要取消设置系统属性,请通过在我们的程序中定义它来使其为空,如下所示:
Global 设置有一些限制;在这里,代理 API 的概念出现了。让我们讨论一下全局设置的局限性:
全局配置方法的局限性
全局配置方法是定义代理的最简单方法,但这种方法有一些局限性。
这种方法提供了在 JVM 范围内的实现,因此为特定协议定义的设置在JVM的生命周期内都是有效的,或者直到我们手动取消设置它们。
为了克服这个限制,如果需要,打开和关闭设置可能很有吸引力。但是,有必要确保采取措施防止多线程程序中的并发问题。
因此,作为替代方案,代理 API 更高效,并提供对代理配置的更多控制。
使用代理 API 设置代理
Java Proxy 类提供了一种基于连接配置代理的便捷方法。如果我们使用 Proxy 类设置代理,它将覆盖现有的 JVM 范围代理设置。
使用 Proxy 类的 Proxy.Type() 方法可以定义三种类型的代理:
让我们了解这些代理:
1) HTTP 代理
要使用 HTTP 代理,请使用代理包装 SocketAddress 实例并提供类型为Proxt.Type.HTTP。现在,我们可以简单地将代理实例传递给URLConnection.openConnection()。考虑以下代码:
现在,我们将连接到 URL_STRING,然后通过托管在 127.0.0.1:3020 的代理服务器路由该连接。
2) 直接代理
直接代理对于直接连接到主机很有用。在这种情况下,我们必须显式绕过可以使用静态“proxy.NO_PROXY”实例全局配置的代理。在内部,代理 API 使用 Proxy.Type.Direct 类型创建一个新的代理实例。
考虑以下代码:
基本上,如果没有全局配置的代理,那么这将与不带参数调用 openConnection() 相同。
3) Socks代理
Socks 代理在处理 URLConnection 时以类似于 HTTP 变体的方式工作。在 Socks 代理中,首先我们使用 Proxy.Type.SOCKS 类型用代理包装一个 SocketAddress 实例。之后,将 Proxy 实例传递给 URLConnection.openConnection。考虑以下代码:
我们还可以在连接到 TCP 套接字时使用 SOCKs 代理。为此,我们需要使用 Proxy 实例来创建 Socket。之后,目标 SocketAddress 实例被传递给 Socket.connect() 方法。
考虑以下代码:
创建简单代理服务器的 Java 程序
TestProxyServer.java:
import java.io.*;
import java.net.*;
public class TestProxyServer {
public static void main(String[] args) throws IOException {
try {
String host = "localhost";
int remoteport = 80;
int localport = 8026;
// Printing a start-up message
System.out.println("Starting proxy for " + host + ":" + remoteport + " on port " + localport);
// And start running the server
runServer(host, remoteport, localport); // never returns
} catch (Exception e) {
System.err.println(e); // Prints the standard errors
}
}
/**
* It will run a single-threaded proxy server on the provided local port.
*/
public static void runServer(String host, int remoteport, int localport) throws IOException {
// Creating a ServerSocket to listen for connections with
ServerSocket s = new ServerSocket(localport);
final byte[] request = new byte[1024];
byte[] reply = new byte[4096];
while (true) {
Socket client = null, server = null;
try {
// It will wait for a connection on the local port
client = s.accept();
final InputStream streamFromClient = client.getInputStream();
final OutputStream streamToClient = client.getOutputStream();
// Create a connection to the real server.
// If we cannot connect to the server, send an error to the
// client, disconnect, and continue waiting for connections.
try {
server = new Socket(host, remoteport);
} catch (IOException e) {
PrintWriter out = new PrintWriter(streamToClient);
out.print("Proxy server cannot connect to " + host + ":" + remoteport + ":\n" + e + "\n");
out.flush();
client.close();
continue;
}
// Get server streams.
final InputStream streamFromServer = server.getInputStream();
final OutputStream streamToServer = server.getOutputStream();
// a thread to read the client's requests and pass them
// to the server. A separate thread for asynchronous.
Thread t = new Thread() {
public void run() {
int bytesRead;
try {
while ((bytesRead = streamFromClient.read(request)) != -1) {
streamToServer.write(request, 0, bytesRead);
streamToServer.flush();
}
} catch (IOException e) {
}
// the client closed the connection to us, so close our
// connection to the server.
try {
streamToServer.close();
} catch (IOException e) {
}
}
};
// Start the client-to-server request thread running
t.start();
// Read the server's responses
// and pass them back to the client.
int bytesRead;
try {
while ((bytesRead = streamFromServer.read(reply)) != -1) {
streamToClient.write(reply, 0, bytesRead);
streamToClient.flush();
}
} catch (IOException e) {
}
// The server closed its connection to us, so we close our
// connection to our client.
streamToClient.close();
} catch (IOException e) {
System.err.println(e);
} finally {
try {
if (server != null)
server.close();
if (client != null)
client.close();
} catch (IOException e) {
}
}
}
}
}
2026-04-13
2026-04-13
2026-04-13
2026-04-13
2026-04-13
2023-01-17

关注巨量HTTP公众号
Copyright © 版权所有 湖北巨量云科技有限公司孝感分公司
本模板版权局已登记·盗版必究,登记号:黔作登字-2021-F-00331209


在线客服

客户定制
QQ客服 (09:00 - 24:00)
咨询热线 (09:00 - 24:00)
15629532303

扫码联系微信客服

公众号
扫码关注微信公众号

返回顶部